A table is an HTML element that organizes data in rows and columns format. For example,
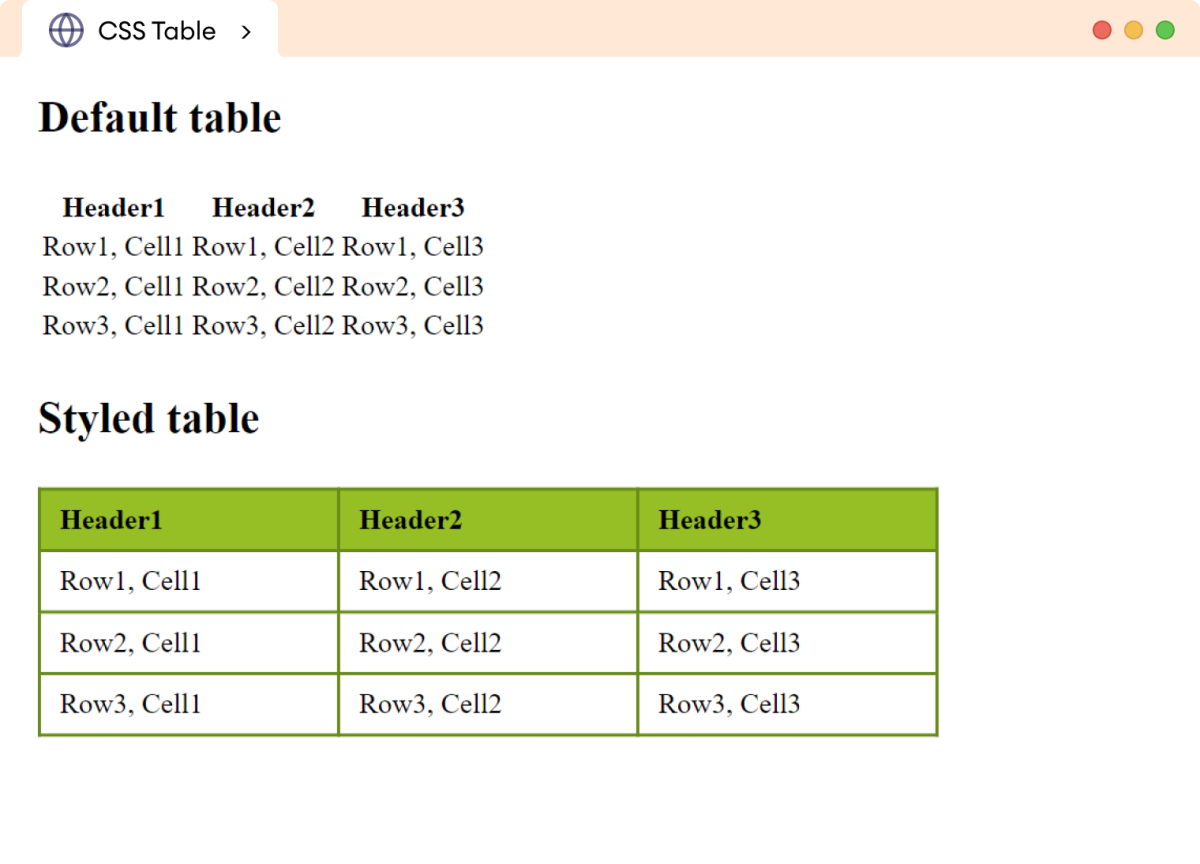
The above example shows the default table and a
CSS-styled table.
Create a Table
A table is created with the help of table, tr,
th, and td tags. For example,
<table>
    <tr>
        <th>Name</th>
        <th>Location</th>
    </tr>
    <tr>
        <td>James</td>
        <td>Chicago</td>
    </tr>
    <tr>
        <td>Robert</td>
        <td>New York</td>
    </tr>
</table>
Browser Output

In the above example, the default table doesn't look good without any styles.
Style Your Table
We can add the following styles for the table,
- Table borders
- Collapse table borders
- Border spacing
- Table size
- Table layout
- Horizontal alignment
- Vertical alignment
- Background color
- Table padding
- Dividing the rows
- Hover effect
Let's look at each of them in detail.
Table Border
The border property adds a border to the table. For example,
<!DOCTYPE html>
<html>

    <head>
        <meta charset="UTF-8" />
        <meta name="viewport" content="width=device-width, initial-scale=1.0" />
        <link rel="stylesheet" href="style.css" />
        <title>CSS Table Border</title>
    </head>


    <body>

        <table>
            <tr>
                <th>Name</th>
                <th>Location</th>
            </tr>
            <tr>
                <td>James</td>
                <td>Chicago</td>
            </tr>
            <tr>
                <td>Robert</td>
                <td>New York</td>
            </tr>
            <tr>
                <td>Charlie</td>
                <td>Boston</td>
            </tr>

        </table>
    </body>

</html>
/* applies border to the table */
table,th,td {
    border: 1px solid black;
}
Browser Output

In the above example,
border: 1px solid black
adds a solid black border of 1px around the table
elements.
Collapse Table Border
The border-collapse property merges the border between the
table cells into a single border. For example,
table {
    border-collapse: collapse;
}
Browser Output

Here, the borders between the table cells are merged into a single border.
Border Spacing
The border-spacing property specifies the gap between the
adjacent cell borders. For example,
table {
    border-spacing: 20px;
}
Browser Output
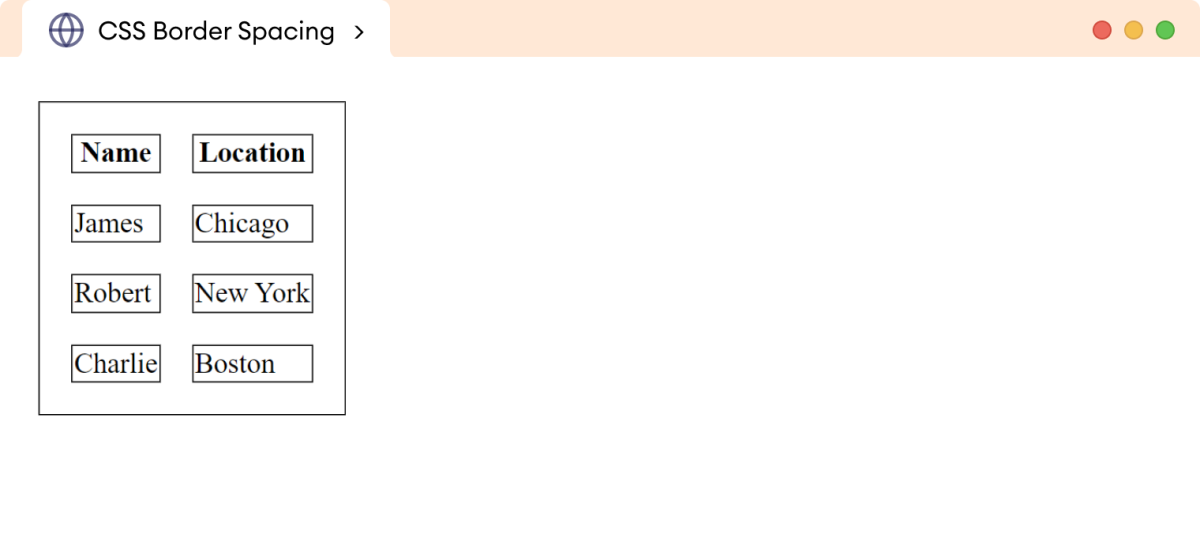
Here, 20 pixels gap is added between the adjacent border cells.
Table Size
The size of the table can be changed by using the width and
height properties. For example,
table {
    border-collapse: collapse;
    border: 1px solid black;
    width: 80%;
    height: 170px;
}
Browser Output
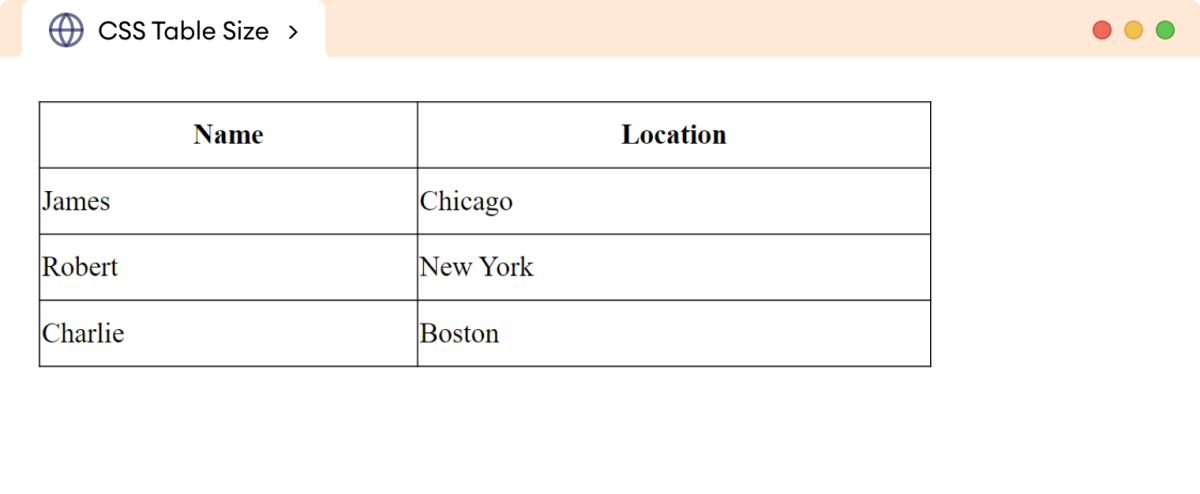
Here, the table takes 80% width of the document, and the height
increases to 170 pixels.
Table Layout
The table-layout property specifies the structure and behavior
of the table.
It can take one of the following values:
-
auto: adjusts the column widths automatically based on content fixed: specifies the fixed column width
Let's see an example,
<!DOCTYPE html>
<html>

    <head>
        <meta charset="UTF-8" />
        <meta name="viewport" content="width=device-width, initial-scale=1.0" />
        <link rel="stylesheet" href="style.css" />
        <title>CSS Table Layout</title>
    </head>


    <body>
        <table>
            <tr>
                <th>Header 1</th>
                <th>Header 2</th>
                <th>Header 3</th>
            </tr>

            <tr>
                <td>
                    This table cell contains large amount of the text.
                </td>
                <td>Cell 2</td>
                <td>Cell 3</td>
            </tr>
        </table>
    </body>

</html>
/* styles table with fixed layout */
table {
    width: 500px;
    table-layout: fixed;
}

table, th , td {
    border: 1px solid black;
    border-collapse: collapse;
}
Browser Output

In the above example, the table has the table-layout property
set to fixed, and width is set to
500px. Hence, all the columns of the table maintain the fixed
width.
Now, changing the table layout to auto by adding
table-layout: auto;
creates the following output.
Browser Output

Here, the auto value makes the columns flexible, allowing them
to adjust their width as required by the content.
The table width remains fixed at 500px, but the columns now
adapt to the content.
Horizontal Alignment
The text-align property sets the horizontal alignment of the
table content. For example,
<!DOCTYPE html>
<html>

    <head>
        <meta charset="UTF-8" />
        <meta name="viewport" content="width=device-width, initial-scale=1.0" />
        <link rel="stylesheet" href="style.css" />
        <title>CSS Horizontal Alignment</title>
    </head>


    <body>
        <h2>Horizontal alignment</h2>
        <table>

            <tr>
                <th>text-align: left</th>
                <th>text-align: right</th>
                <th>text-align: center</th>
                <th>text-align:justify</th>
            </tr>

            <tr>
                <td class="first-data">Left</td>
                <td class="second-data">Right</td>
                <td class="third-data">Center</td>
                <td class="fourth-data">Justify the content</td>
            </tr>

        </table>
    </body>

</html>
.first-data {
    text-align: left;
}

.second-data {
    text-align: right;
}

.third-data {
    text-align: center;
}

.fourth-data {
    text-align: center;
}

table {
    width: 100%;
    border-collapse: collapse;
}

table,th,td {
    border: 1px solid black;
}
Browser Output

The above example shows the different alignment positions of text in the table cells.
Note: By default, the content inside the table cells is left-aligned.
Vertical Alignment
The vertical-align property sets the vertical alignment of the
table content.
Let's see an example,
<!DOCTYPE html>
<html>

    <head>
        <meta charset="UTF-8" />
        <meta name="viewport" content="width=device-width, initial-scale=1.0" />
        <link rel="stylesheet" href="style.css" />
        <title>CSS Vertical Alignment</title>
    </head>


    <body>
        <h2>Vertical alignment</h2>
        <table>

            <tr>
                <th>vertical-align: top</th>
                <th>vertical-align: bottom</th>
                <th>vertical-align: middle</th>
                <th>vertical-align:baseline</th>
            </tr>

            <tr>
                <td class="first-data">Top</td>
                <td class="second-data">Bottom</td>
                <td class="third-data">Middle</td>
                <td class="fourth-data">Baseline</td>
            </tr>

        </table>
    </body>

</html>
.first-data {
    vertical-align: top;
}

.second-data {
    vertical-align: bottom;
}

.third-data {
    vertical-align: middle;
}

.fourth-data {
    vertical-align: baseline;
}

table {
    width: 100%;
    border-collapse: collapse;
}

table,th,td {
    border: 1px solid black;
}

td {
    height: 50px;
}
Browser Output
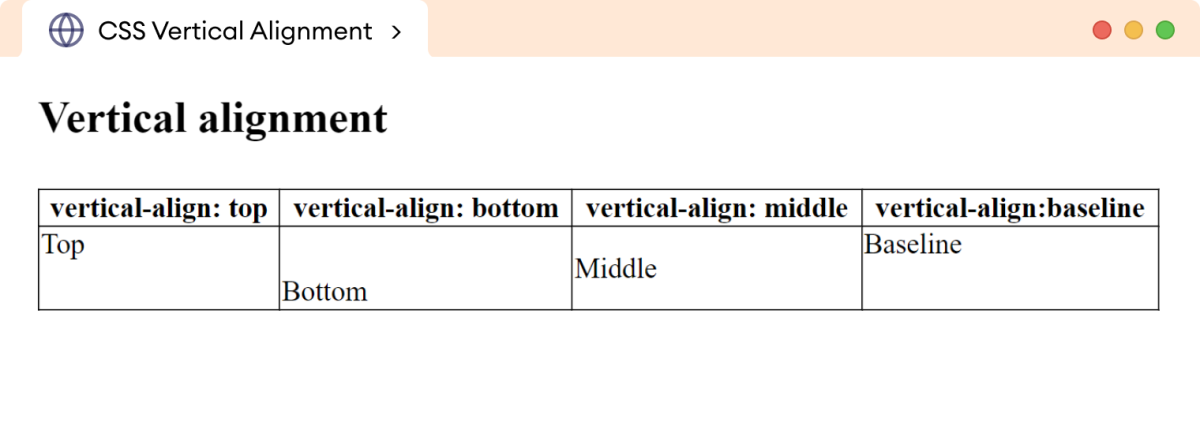
The above example shows the different vertical alignment position of the text in the table cells.
Note: By default, the content in a table cell is vertically aligned to the middle.
Background Color
The table can be styled with different background colors. For example,
<!DOCTYPE html>
<html>

    <head>
        <meta charset="UTF-8" />
        <meta name="viewport" content="width=device-width, initial-scale=1.0" />
        <link rel="stylesheet" href="style.css" />
        <title>CSS Background Color</title>
    </head>


    <body>
        <table>
            <tr>
                <th>Name</th>
                <th>Location</th>
            </tr>

            <tr >
                <td>James</td>
                <td>Chicago</td>
            </tr>

            <tr >
                <td>Robert</td>
                <td>New York</td>
            </tr>

        </table>
    </body>

</html>
th {
    background-color: greenyellow;
}

tr {
    background-color: yellow;
}

table {
    border-collapse: collapse;
    width: 100%;
}

table, th, td {
    border: 1px solid black;
}
Browser Output

In the above example, the background-color property adds
greenyellow color to the table head and
yellow color to the table rows.
Table Padding
The padding property adds the space between the border and the
content. For example,
<!DOCTYPE html>
<html>

    <head>
        <title>Table padding</title>
        <link rel="stylesheet" href="style.css" />
    </head>

    <body>
        <table>
            <tr>
                <th>Name</th>
                <th>Location</th>
            </tr>

            <tr>
                <td>James</td>
                <td>Chicago</td>
            </tr>

            <tr>
                <td>Robert</td>
                <td>New York</td>
            </tr>

            <tr>
                <td>Charlie</td>
                <td>Boston</td>
            </tr>

        </table>
    </body>

</html>
th,td {
    padding: 15px;
}

table {
    border-collapse: collapse;
}

table,th,td {
    border: 1px solid black;
}
Browser Output
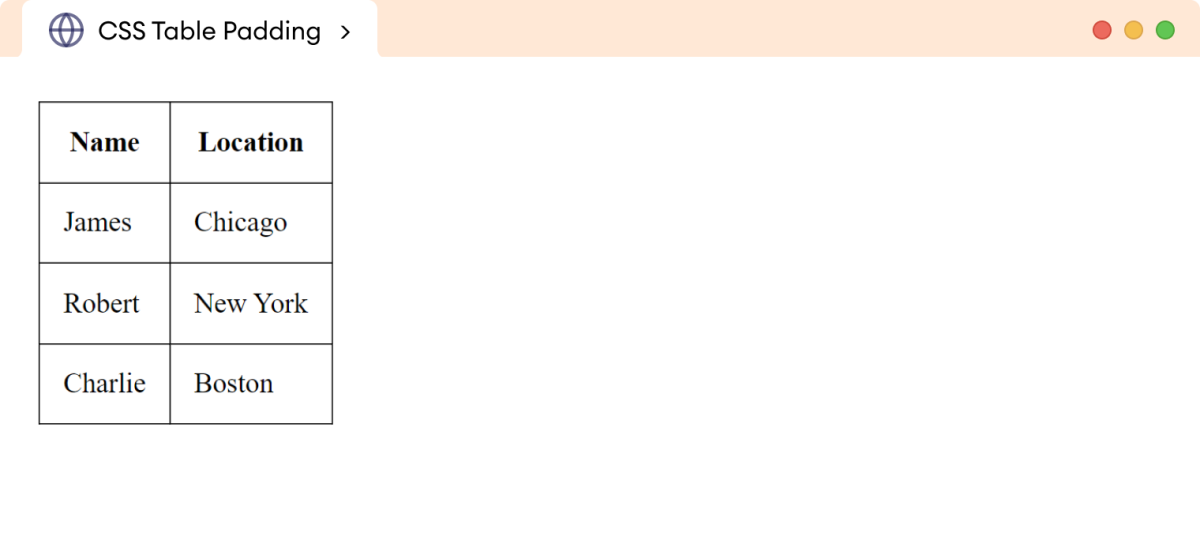
In the above example,
padding: 15px
adds a 15 pixels gap between the border and the content in the
table.
Divide the Table Rows
We can use the border-bottom property to create a horizontal
division between the rows of the table. For example,
th,td {
    border-bottom: 1px solid gray;
    padding: 12px;
    text-align: center;
}
Browser Output
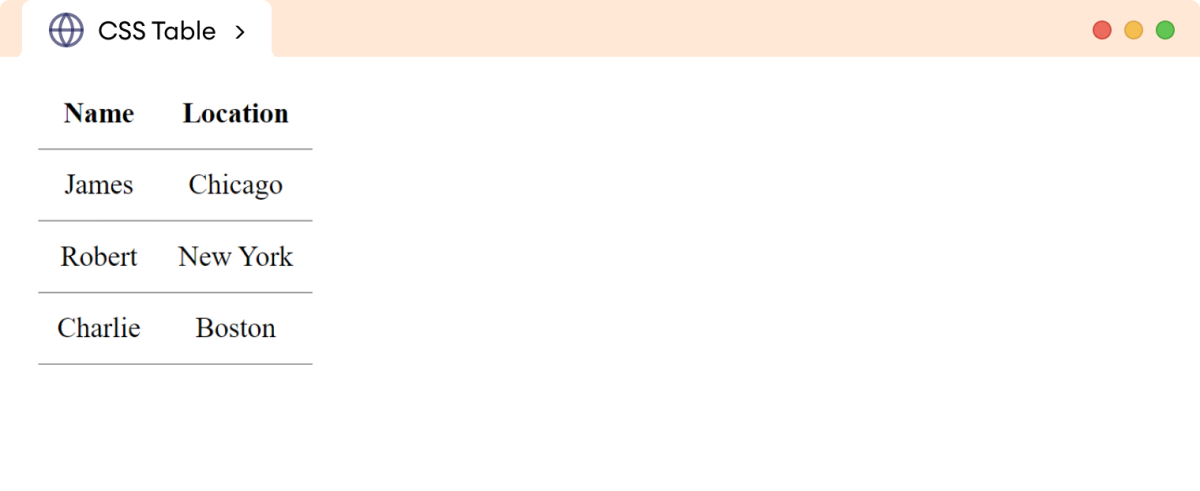
Here, the border-bottom property separates the rows in the
table.
Note: We can use the border-right or border-left property in <td> element to create a vertical divider in the table.
Hoverable Table
We can add the hover effect to the table elements with the help of the
hover pseudo-class selector. For example,
tr:hover {
    background-color: yellow;
}
Browser Output
| Name | Location |
|---|---|
| James | Chicago |
| Robert | New York |
Here, the background color of the row changes to yellow when
hovering over it.